Hearing aids are an investment, and in order to get the most out of your investment, you need to know how to care for your hearing aids. The better you care for your hearing aids, the longer they’ll last, and the more effectively they’ll correct your hearing loss.
In this guide, I’ll walk you through the process of safely and effectively cleaning your hearing aids to remove earwax and other kinds of build-up, so you can enjoy the best hearing experience possible while extending the lifespan of your hearing aids.
But before we get started, let’s identify your hearing aid type because this will affect the cleaning process.
What Type of Hearing Aids Do You Have?
Let’s start by determining which of the three primary styles you have:
Behind-the-Ear (BTE)
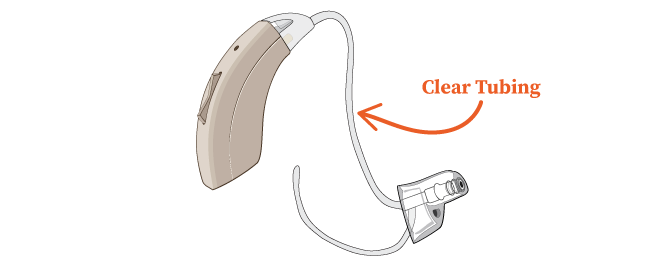
As the name implies, behind-the-ear hearing aids have all of their components – the microphones, processors, and speakers – resting behind the ear. You can identify a BTE hearing aid by the clear, flexible tubing with a tip at the end that inserts into your ear. The tubing and the tip offer an air-channel that directs amplified sound into your ear canal.
Please note that the plastic tubing and tip do not contain any wires or electrical parts. That’s how you know you have a BTE, and not a receiver-in-the-canal (RIC) hearing aid.
Receiver-in-the-Canal (RIC)
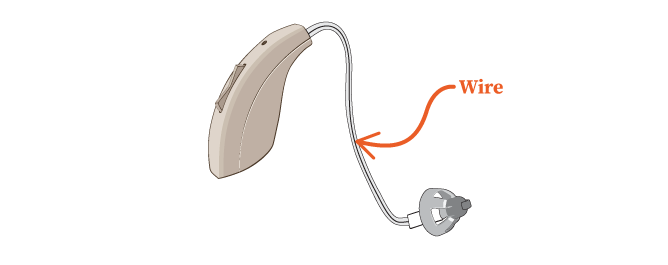
A receiver-in-the-canal hearing aid looks similar to a BTE hearing aid, but instead of the clear tubing, it has a wire that’s covered in flexible plastic. This wire connects to a tiny speaker (called a “receiver”) within the tip that inserts in your ear. Audiologists call these hearing aids RICs or “ricks.”
Cleaning a RIC doesn’t require you to remove the earpiece tip, but you’ll still need to clean wax away from the tip and clean the microphone ports.
Important: Do not try to remove the receiver wire and tip when cleaning a RIC. It’s fixed in the hearing aid with a small pin, so you can’t unscrew it or pull it off.
In-the-Ear (ITE)

The last type of hearing aid is called an in-the-ear (ITE) hearing aid because it sits fully inside the “bowl” of your ear. Sometimes these hearing aids are large enough to see, and sometimes they’re so small that they hide completely in the ear canal.
Like RICs, ITEs don’t have a clear plastic tube to clean. However, you’ll still need to clean the microphone ports and the body of the hearing aid to make sure it keeps working properly, which we’ll discuss in detail below.
Hearing Aid Cleaning Instructions
Now that you’ve identified your hearing aid type, you can follow the steps below to clean your hearing aids. Please note that some of the steps are for specific hearing aid types (indicated in the title of the step), and some are for all of the types.
STEP 1: Gather Your Cleaning Tools (All Types)
Hearing aids come with different types of cleaning tools:
BTE hearing aids: The cleaning tool for BTE hearing aids has a brush on one end and a long wire on the other. The brush is for cleaning the outside of the hearing aid, and the wire is for cleaning out the flexible tubing.

RIC and ITE Hearing aids: The cleaning tool for RIC and ITE hearing aids has a little brush on one end and a short wire loop on the other. The loop is called a “wax loop.” It’s for removing earwax from hard to reach places.

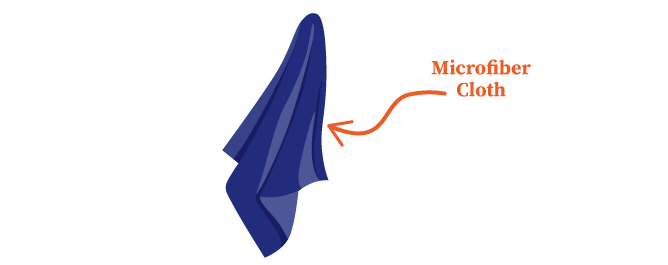
Finally, you'll want to have a tissue or microfiber cloth on hand to clean different areas of the hearing instrument.
STEP 2: Remove the Battery (All Hearing Aid Types)
Removing the battery ensures that the device is off. Otherwise, you might hear a loud whistle when you remove the tubing. If it’s a rechargeable hearing aid, simply make sure that the hearing aid is off since you can’t remove the battery.
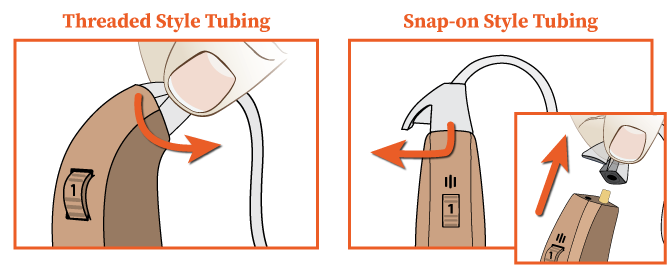
STEP 3: Remove the Tubing (BTE Only)
Before you can remove the tubing from the hearing aid body, you need to determine which style of tubing your BTE hearing aid has—either a “threaded style” or a “snap-on style.” The way you remove each style is different, so check your user manual to find out which one you have.
Reminder: If you have RIC hearing aids, the wire is fixed with a pin, and you should not try to remove it.
Threaded style BTEs: Gently rotate the base of the tubing counterclockwise where it connects with the hearing aid. The tubing will unscrew like a bottle cap and come off with little to no resistance. The MDHearing AIR and MDHearing PRO models have the threaded style.
Snap-on style BTEs: You’ll feel a little more resistance as you turn the tubing of the snap-on style counterclockwise. Hold the hearing aid body with one hand and the triangular base of the tubing with the other. Turn the tubing 90 degrees, and then it should slide right off. The MDHearing VOLT and CORE models have the snap-on style.
STEP 4: Clean the Tubing (BTE Only)
Gather the clear tubing that you just removed, the cleaning wire tool, and your microfiber cloth. Insert the wire into the triangular end of the tubing that connects to the hearing aid body, and thread it through until the wire pops out of the tip at the other end.
It’s very important to start threading at the base of the tubing first because the tip that inserts into your ear is where all the wax and blockage will be. You want to push the wax out of the tip, not push it deeper into the tube.
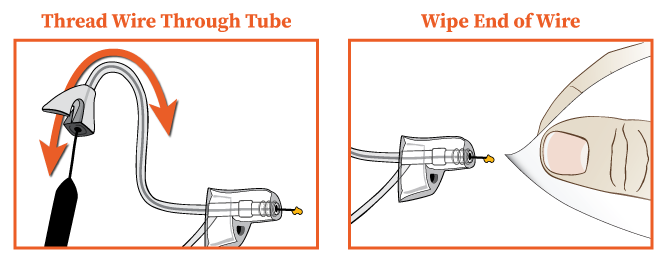
After threading the wire through the tube and out of the tip, use the microfiber cloth or tissue to clean off any debris on the end of the wire. Finally, pull the wire back out of the tubing. Repeat this process several times to make sure the tubing is completely clean. Always remember to wipe off the end of the wire before pulling it back out of the tube.
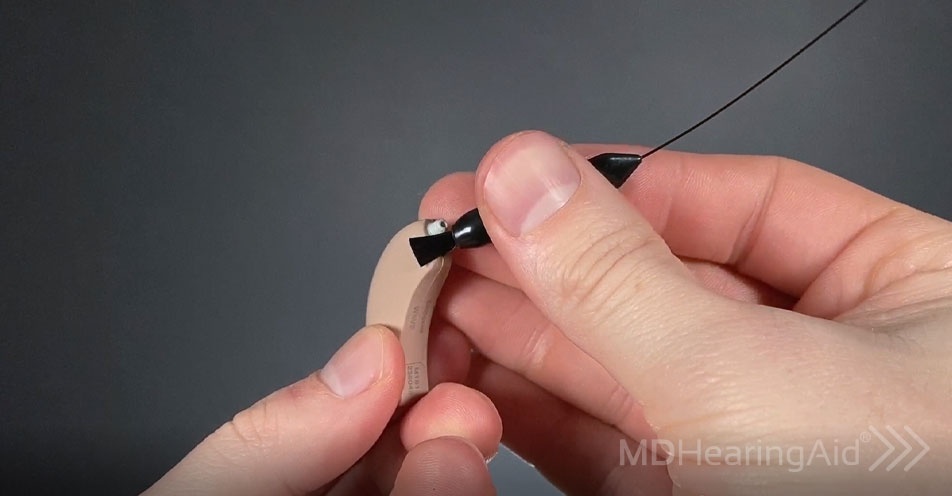
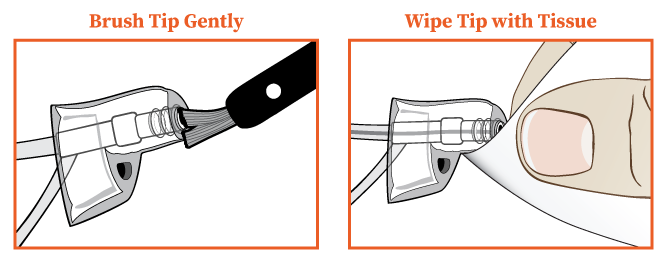
STEP 5: Clean the Tip (All Hearing Aids)
Now we’re going to clean the hearing aid tip that inserts into your ear. There are a few different styles of tips that might be on your hearing aid:
- Round circular domes
- Funnel tips
- Mushroom tips
- ComfortTIPs
- RIC earpiece (with receiver)
All MDHearings have ComfortTIPs. These offer the affordability and flexibility of round circular domes with the comfort of a custom-fitted ear mold. ComfortTIPs are sloped on one side and slightly curved to mirror the natural shape of the ear canal. This offers a snug and comfortable fit.**
Cleaning the tip of a BTE and RIC hearing aid is easy. All you need is the brush end of the cleaning tool and your microfiber cloth or tissue. First, gently brush the outside of the tip to remove any ear wax or debris.
Then, use the cloth to wipe the outside of the tip until it’s clean.
For RIC and ITE hearing aids, use the “wax loop” on the end of your tool to remove any built-up wax from inside the earpiece.
STEP 6: Clean the Body and Microphones (All Hearing Aids)
To clean the body, we need the brush end of the cleaning tool and the cloth. Start by gently wiping down the hearing aid with your cloth to remove any sweat, oils, and debris.
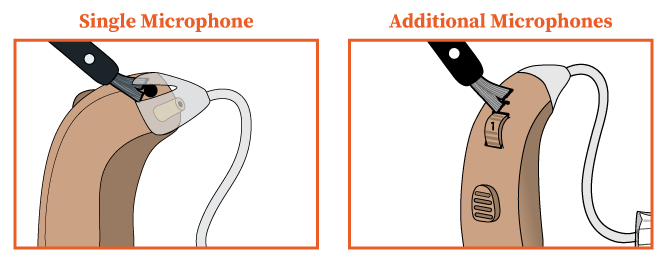
To clean the microphone ports, locate the tiny holes where the microphones. Here’s how to find them:
Single microphone hearing aids: On single mic hearing aids, you’ll probably find the microphone where the hearing aid connects to the tubing. The microphone port will look like a little black circle or a small hole.
Multiple microphone hearing aids: If your hearing aid has any additional microphones, you’ll likely find them on the spine of the hearing aid near the controls. The microphone port will look like a small hole, a couple of holes, or a small grill.

ITE hearing aids: With ITE hearing aids, the microphone ports also look like little black circles or small holes.
After identifying microphone ports, use the brush end of the cleaning tool to gently brush the microphone holes. This will remove dust and debris where the hearing aid picks up sound. Any blockage here will impact the sound that reaches your ear, so it’s essential to keep the microphone ports clean and free of debris.
Important: We don't want to damage the microphones, so never force the brush deep inside the microphone port, and never “poke” the microphone with the brush or anything else. If gentle brushing doesn’t suffice, send the hearing aid in for repairs.
STEP 8: Reattach the Tubing (BTE Only)
Here’s how to put the tubing back on your BTE hearing aid body:
Threaded style: Gently screw the base of the tubing back into the hearing aid using a clockwise motion. Make sure the tubing is facing forward and flush with the sides of the hearing aid body when you are done.
Snap-on style: Simply push the tubing directly onto the base of the hearing aid. You don't need to rotate the tubing. Just press the tubing until you feel it “snap” into place. As a final check, make sure the tubing base is flush with the sides of the hearing aid.
STEP 9: Insert the Battery (All Hearing Aids)
Put the battery back into your device and enjoy the crisp and clear sounds from your newly cleaned hearing aid!
How Often Should I Clean My Hearing Aids?
You’re probably wondering how often you should clean your hearing aids. I suggest cleaning them every day or every other day. Here’s why:
- Extend the lifespan of your hearing aids: Regular cleaning is the easiest way to extend the life of your hearing aids.
- Hearing aids get dirty every day: You’re continually producing earwax, sweat, and oils, as well as exposing the hearing aid to dust and debris from your environment.
- Clean hearing aids to work properly: Just a tiny bit of wax can completely block the sound going into or out of the hearing aid.
Final Tips for Cleaning Your Hearing Aids
Before you go, I’d like to offer some final hearing aid cleaning tips and advice:
- Wax blockage is usually the problem: Wax blockage in tubing, tips, or receivers is the usual culprit when your hearing aid is experiencing performance problems. Wax buildup in the microphone ports could also be the problem, so make sure you go through all of the cleaning steps above if you’re lacking sound from your device.
- If your hearing aid stops working: Even if you just cleaned it, the first thing to do when your hearing aids stop working properly is to clean the tubing and brush of the microphone ports. Don't replace the battery, don’t take it in for service, and don't throw it away. Give it a nice cleaning instead. That should solve the issue 95% of the time!
- Never use water or alcohol to clean your hearing aids: There is nothing worse for your hearing aids than moisture. Whether it’s alcohol, water, sweat, or something else, liquids can permanently damage your hearing aid, even if you’re just cleaning the silicone tips and tubing.
- Tips and tubing don’t last forever: Eventually, your hearing aid tips, tubing, domes, or receiver will lose their shape or discolor. The tubing will stiffen and possibly get bent out of shape. Worn out tips and tubing could slowly and imperceptibly decrease the quality of sound reaching your ears. For this reason, I recommend replacing your tubing and tips every three to six months. I have had countless customers who thought their hearing aids were broken, but we fixed them in an instant with new tips and tubing. Replacement tips and tubing for MDHearings can be purchased online or over the phone with one of our hearing aid specialists.
Happy Hearing!
Congratulations! You’ve reached the end of this guide. If you follow these steps every day or every other day, you will significantly increase both the lifespan and performance of your hearing aids.
MDHearing: Quality, Affordable, Medical-Grade Hearing Aids
At MDHearing, we design and manufacture high-quality, FDA-registered hearing aids that fit 94% of individuals with hearing loss. Our brilliant team of audiology engineers and audiologists at MDHearing designed our devices to be the ideal blend of high quality and affordability — so budget-conscious hearing loss patients can afford some of the best treatment available.
With incredible prices ranging from $399 to $999 a pair, we keep our costs down by selling hearing aids direct-to-consumer. Order MDHearings on our website, and we’ll ship them directly to your door in just a couple of days. Best of all, if you don’t like your hearing aids, you can send them back to us during your 45-day trial period for a full refund.
Learn more about MDHearing and our line of affordable, high-quality hearing aids.
BROWSE MDHearing